| ||||||||||||||||||
| ||||||||||||||||||
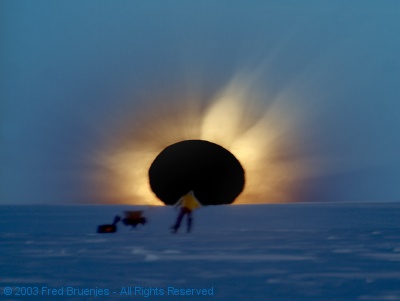 |
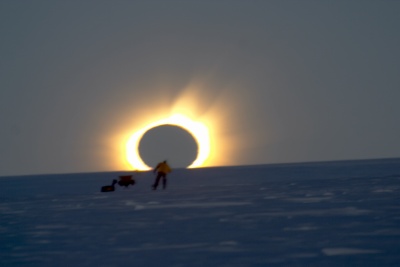
The signature image of my trip to Antarctica is a composite photo showing the Sun during totality, with a fellow eclipse chaser superimposed on the Sun. This image was intended to convey the feeling of the eclipse, the emotions it evoked, rather than be a strict scientifically precise representation. I guess I succeeded in evoking emotions, because I have gotten a phenomenal reaction to it: everything from "it's a Photoshopped fake" to "I love it, how can I buy a print". To the doubters: this is a real image, I was really there and that's what it really looked like. Interestingly, people who have never seen a total solar eclipse think it's fake, while people who HAVE seen a total eclipse (particularly those with me in Antarctica) think I got the image exactly right!
The image was the Astronomy Picture of the Day on December 8th, 2003, and was CNN.com's Space Scene of the week starting December 17th, 2003. My website got half a million hits during December 2003.
This particular webpage shows how the image was made, and how it differs from reality. Let me start by saying that the image is a composite of four photos. The Sun's corona (the diffuse halo with streamers that reach outward) has an incredible range of brightness. Near the Sun it's very bright, as bright as a full Moon, and it then tapers down quickly into the twilight around it. No camera (except some one-of-a-kind hideously expensive scientific cameras) can capture this range of brightness in a single exposure, so multiple exposures are required to capture the full range of brightness. The conventional wisdom with film cameras is to take exposures one stop apart. The superior quality of a low-noise digital SLR camera allows that to be expanded to three or four stops.
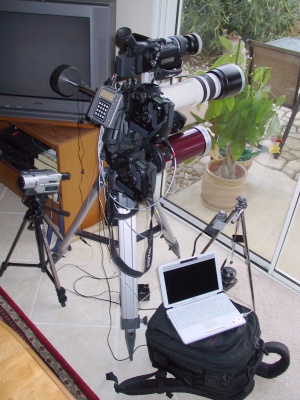
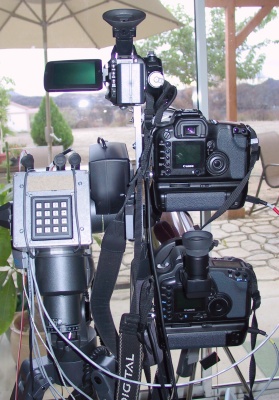
Below are two photos of my equipment setup, taken during testing at home before the eclipse. It is substantially similar to the setup I used so successfully in Australia. Yes, I took this entire kit to Antarctica!
|
|
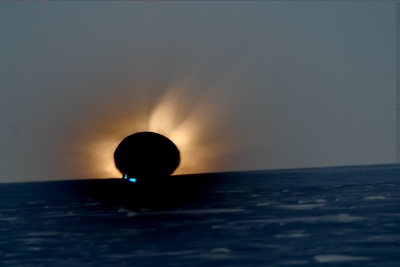
So the plan was to take a series of exposures three stops apart, plus some shots around second and third contact to see the prominences. To accomplish this I built a standalone controller box, which had been preprogrammed with a script of exposures for four of my seven cameras. The controller is the square silver box with a 4x4 keypad. Now, I have a rule for the minutes before total eclipses: if a piece of equipment doesn't work on the first try, give it a second try, if it fails again then CHUCK IT! So as it turned out, the extremely cold weather at the eclipse site caused the controller to malfunction (I believe batteries were the culprit), and I ended up doing the exposure sequence by hand. I wanted to focus on observing the eclipse rather than fuddling with cameras, so during totality I mindlessly moved the exposure control on my cameras back and forth while pushing the shutter buttons. Of four cameras, one died from batteries, one appeared to have died (it was actually taking very long exposures), and two mostly worked (even though my initial impression was that they hadn't). The result was a bunch of blurred or underexposed or overexposed photos with only a handful of usable images. Luckily the good ones were in the right ranges to do a composite. Below are the four images that went into the composite, presented exactly as they came out of the camera (except for resizing from 3072x2048 to 400x267).
The images above have incorrect color, because the camera's auto white balance system was fooled by the strange environment. Notice how the colors shift from image to image. None of the images have colors that match what I remember.
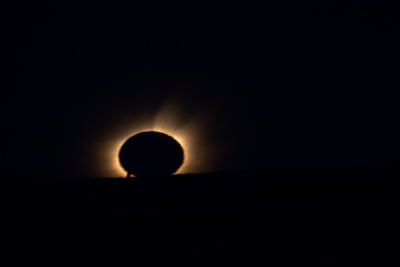
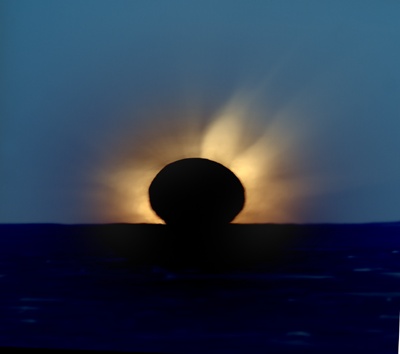
The first step in creating the composite was to convert the RAW camera images into 16bit linear TIFF files. These files preserve the raw data from the camera, have fixed white balance, and have a nearly linear relationship between true brightness and pixel value. I chose the three lower images above for the coronal composite. I normalized the pixel values into intensity by dividing each pixel value by the image exposure time. The images were then blended together by masking out the overexposed and underexposed regions in each image and stacking them. Then a radial gradient intensity filter was applied to compensate for the range of brightness in the corona. The result is this image:
I couldn't get the radial gradient quite right, the middle corona is too bright. In reality the corona drops off in brightness like the earlier raw images, so this was a compromise to keep things within the range of consumer computer monitors. The gradient has the unpleasant side effect of making the Moon jet black. This is incorrect, that area should be roughly the same color as the surrounding sky. There is no easy way of fixing this, and in truth it actually mimics the behavior of the eye: things appear darker when they're next to a bright object. The bright inner corona makes the Moon appear darker than it really is.
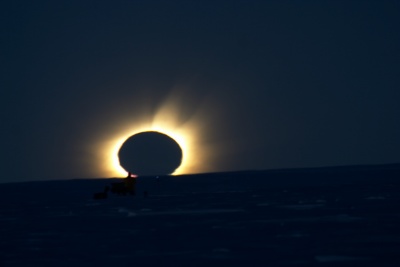
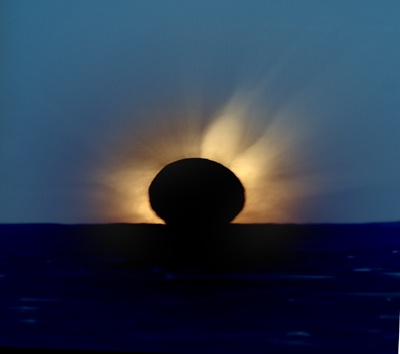
Now the image above has a big problem in that the colors are wrong. They're close, but they're not what I remember. So I used Photoshop to slightly alter the balance and saturation of the colors. This is where I depart from reality slightly: the image below has colors that are more saturated than they were in real life. I did this to add to the excitement of the image. It's a subtle change (compare with image above) but I think it was necessary. I also rotated and cropped the image, and painted out the bright blue artifact at the 8 o'clock position on the Sun. This artifact came about because the person in the photo moved between the exposures.
Next I performed some radial blur sharpening in Photoshop, a standard technique used in eclipse images. This makes the coronal streamers slightly more defined.
The radial gradient algorithm doesn't know about the ground, so the ground near the Sun is darkened as if there was visible corona there. That's a defect that needs to be corrected by superimposing the ground without a radial gradient filter. I chose to superimpose a different image than the one used for the outer corona, because as you can see in the fourth raw image the person is kneeling and it's not apparent there is a person there.
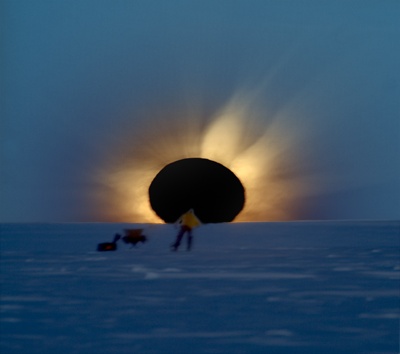
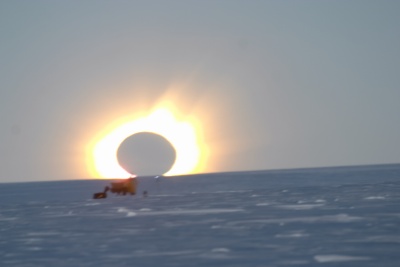
After getting this far into the processing I felt that the image was a little too dark and moody, when our emotion was much more one of joy and celebration, so I upped the brightness a little. The final image then was cropped and had a copyright notice added:
The image isn't perfect, but overall I'm pleased with it. I can't wait until the 2005 eclipse so that I can give it another try.
Please visit the main page first for background information. If you've already read it, then instead please visit my main astronomy page, or check out my homepage.
All text and images are © 2003 Manfred Bruenjes - All Rights Reserved. Image inlining (aka hot linking) and framing are strictly prohibited. Email for permission before using an image or text.